 This post is a follow up on my recent Pagoda3/3B panel design. Recently I have been asked to do an updated revision of my previous pagoda antenna panel for easy ordering. Maarten Baerts recently updated his great pagoda design. My pre-previous article on how to order 160 antennas for 40 bucks was a great success and even got copied by several other blogs (if you read this, shame on you!).
Maarten has released the new design files for his revision 3 and 3B. The B version of this design is meant to be mounted inside a ABS shell. If you do not want to mount a shell you want to order the normal version. Adding a shell detunes the antenna slightly, Maarten has carefully tuned the B version to be spot-on when enclosed in an ABS shell.
My previous pagoda panel post was an updated panel made for this new design. The idea was quite simple, add all the three separate PCB files into one assembled panel, add mouse bites or breakaway tabs and submit it to a PCB manufacturer of your choice. Seeedstudio and Elecrow offer ridiculous low priced pcb sets, you can get 10 copies of your 10x10cm design for as low as $4.99. Unfortunately I did not count in strange manufacturing guidelines. Long story short: seven equal designs on panel = $4.99, seven slightly different designs on one panel = $64.99. Both panels are connected to form one piece. You might ask why there is a price difference? From the manufacturing point of view there is NO difference making those two panels. I had long conversations with Seeed and Elecrow on this. I think they did not get the point I was complaining about. They both argued with low prices and they can not make it cheaper etc. But that was not the point, I asked what makes the real difference in manufacturing costs on both versions. I even offered to add their logo to the panel for a price reduction coupon for my readers… Finally I gave up, I had placed my order at a different board house in the meantime and was waiting for it to arrive.
So here you go: A brand new all-in-one panel that includes an assembly jig as a bonus! This time I placed my order at dangerousprototypes pcb service aka dirtyPCBs. They started as a low quality PCB service offering dirty, low quality and low priced pcbs. In fact they are not “dirty” anymore. They have become a quite good PCB service over the last years. In the end the new design turned out beautifully at the same quality level as Seeedstudio and Elecrow offer:

I even managed to include an antenna assembly jig into the PCB panel itself. Parts from every three panels out of your 10 copies can be assembled to one antenna soldering jig:


Don’t let the fact that you are probably never ordered a custom PCB from a manufacturing company scare you off, in fact it is no big deal. The chinese prices are so low that nothing can go wrong. Most likely you will not have to pay any import taxes as the items value is so low (e.g. <22 Euro for Germany). Just decide which pagoda design you want to have manufactured and follow this guide. I prepared panels for the 5800~MHz version of the revision 3 and 3B (ABS enclosure) in both polarizations for you:
- Pagoda revision 3 – LHCP 5800 MHz
- Pagoda revision 3 – RHCP 5800 MHz
- Pagoda revision 3B – LHCP 5800 MHz
- Pagoda revision 3B – RHCP 5800 MHz
Download the design you chose as a zip file from the list above and head over to the dirtypcb ordering website:
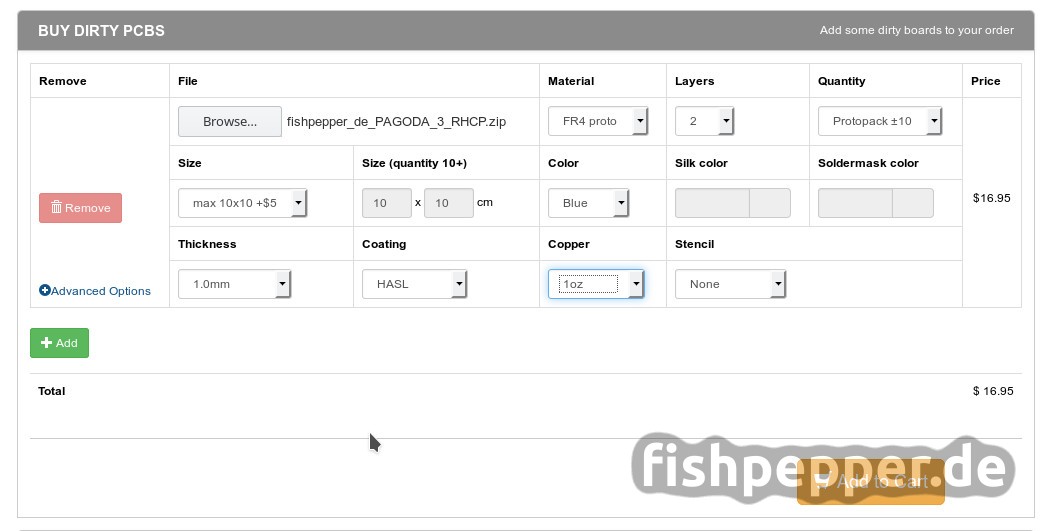
- Click on “Browse…” and upload the zip file you just downloaded
- Change the size to max 10×10
- Make sure to select Protopack +/-10
- IMPORTANT: select 1.0mm Thickness
- Select the solder stop color of your choice
- Click Add to Cart
A new website will load and the preview image should show up after some processing time. Select your country and the shipping method:

That’s it. Proceed to checkout, pay $24.95 for the PCBs, and wait some weeks for them to arrive.
The protopack +/- 10 will result in at least 10 copies of your PCB panel. I was lucky, dirtypcbs sent me 14 copies instead! Each panel has enough parts to assemble six pagoda antennas and 1/3rd of the assembly jig. Just add some cheap presoldered RG402 pigtails from ebay (cut in half) and there you go: dirt cheap pagodas for you. UPDATE: I got some reports that th readymade pigtails seem to have a weak spot on the solder joint and tend to break. The better way would be using RG402 cable and soldering the connectors on your own.
This is a bit more expensive as the previous panels but who needs 160 pagodas? And remember, you get a free assembly jig with this new panel design 😉
Thank you Maarten for sharing the Pagoda design with the world!
Happy soldering!
Hi Guys,could you make same design for pagoda 2 antenna please? i mean like 6 ant on a board with a jig
Cheers
Hi. Thanks for your job.
Two questions:
Is there a possibility to design and send to production web our own logos for the top panels?
Are definitively pagoda 3b compatible with TPU?
A link for the the TPU thinggy would be cool…
regards and thks again
So the ABS one version would that be used for TPU as well? I print all my covers in TPU due to it’s greater durability than ABS especially in the cold.
I have no idea of the hf properties of TPU vs ABS. Maybe ask Maarten Bert, he knows way more on this stuff than I do.
Hello, you can upload the paneled files of Pagoda 3, to send them to https://www.seeedstudio.com
Hey Simon,
received my order today. I was surprised about receiving also 14 boards!
Will start a solder party tomorrow with lots booze….. 😉
Thanks again.
So long,
CR
Good to hear that! Thanks for your feedback.
Nice guide, thanks!
One note on the dirtypcb order process. It is no longer possible to checkout with the old site. However prices/options are the same for their new site.
Hi Simon!
Today I have tried to order Pagoda’s on Dangerous Prototypes website as you recommended in your post however I’m getting following message when adding PCB to basket….
“Please use the upgraded store at DirtyPCBs.com
Thanks for trying the dev site with us! We’ve moved it to a permanent home at DirtyPCBs.com, and have stopped taking orders at this version. There simply wasn’t an upgrade path to get this store to the latest version.”
Do you think ordering from DirtyPCB is too “risky” at this stage ? 🙂
Cheers!
That’s a pitty. I would just give it a try. In the worst case they will mail you and say that it is not going to work.
Please let me know how they turn out, I will update my post then. Thanks for the feedback!
UPDATE: I have received the PCB’s. Everything is sound 🙂 no issues with the order. Now I have to wait for sma connectors to arrive 😉
Good to know! Thanks for your feedback!
Hello !
Would you have a video showing how to set the different pieces together to make the pagoda antenna ?
By the way, is the antenna connector the only thing to “solder ” to the antenna, and where exactly please ?
Maarten has made a good video, this should show you the basic steps:
That’s exactly what I needed 😉
Thanks !
Thanks again for you great work on the pagodas. But please stop recommending the cheap presoldered RG402. The quality of the soldering joint is very low. More than the half of the antennas I build for me and my friends from this pigtails, broke at the soldering joint.
Also the normal RG402 you get on ebay seems not to be the quality like the aomway antennas have. Do you have an idea how to improve the cable?
Thanks!
Ok good to get this feedback. The ones I got from this seller were well made. Do your own solderings keep up better? For what I have seen most of the pagodas break at this point when the antenna gets caught by a tree branch in flight etc.
Yes own soldering keeps up better. An then comes the weak RG402 into play. We do racing, so we crash regularly 😉
Ok, good to know! I updated the post. Thanks!