
No matter if you are building a micro brushless quad or a 5″ racing monster, there is one motor related term that you should definitely know: Your motors velocity constant Kv measured in rpm/Volt. In order to get the most out of your quad you will select a motor and propeller combination that makes optimal use of the motors speed and torque.
But what does this cryptic term stand for? Let’s have a look at a basic example: We chose to run a BR1003B motor with a Kv rating of 8000 rpm/Volt on a single lithium polymer cell with 4.2V. This means that the motors maximum rpm under a no load condition will be around 8000 rpm/Volt x 4.2 Volt = 33600rpm. Do not take that Kv number as a exact number, no two motors are the same and your copies will probably show some variation. But back to the topic:
How to measure the Kv value
It is actually quite easy to measure. The basic idea is to use the motor as a generator by spinning the motor, measure the rpm (externally or electronically), and measure the induced voltage. Then apply some math and there you go. I am going to show you four different ways to measure those values and to derive the Kv rating.
[1] KV / RPM meter
That approach is to easy and I will count it as serious cheating. You could buy a KV rpm meter such as this one on aliexpress, type in the number of magnet pole pairs, spin the motor and read the Kv rating. That’s way to easy and no expensive toys are involved… So let’s continue:
[2] Oscilloscope
If you have access to an oscilloscope this might be another way to do it. As you are going to measure a very low frequency signal, you might be using one of the cheap diy “oscilloscopes” for this task. Something like a DSO150 or DSO138 will do for this application. Please note that those are not real scopes, they are limited to 200kHz. This is very very very low end… A typical microcontroller setup will have signals in the Mhz range. Usually you want to have at least 200Mhz bandwidth for your scope which is 1000 times more than those scopes offer.
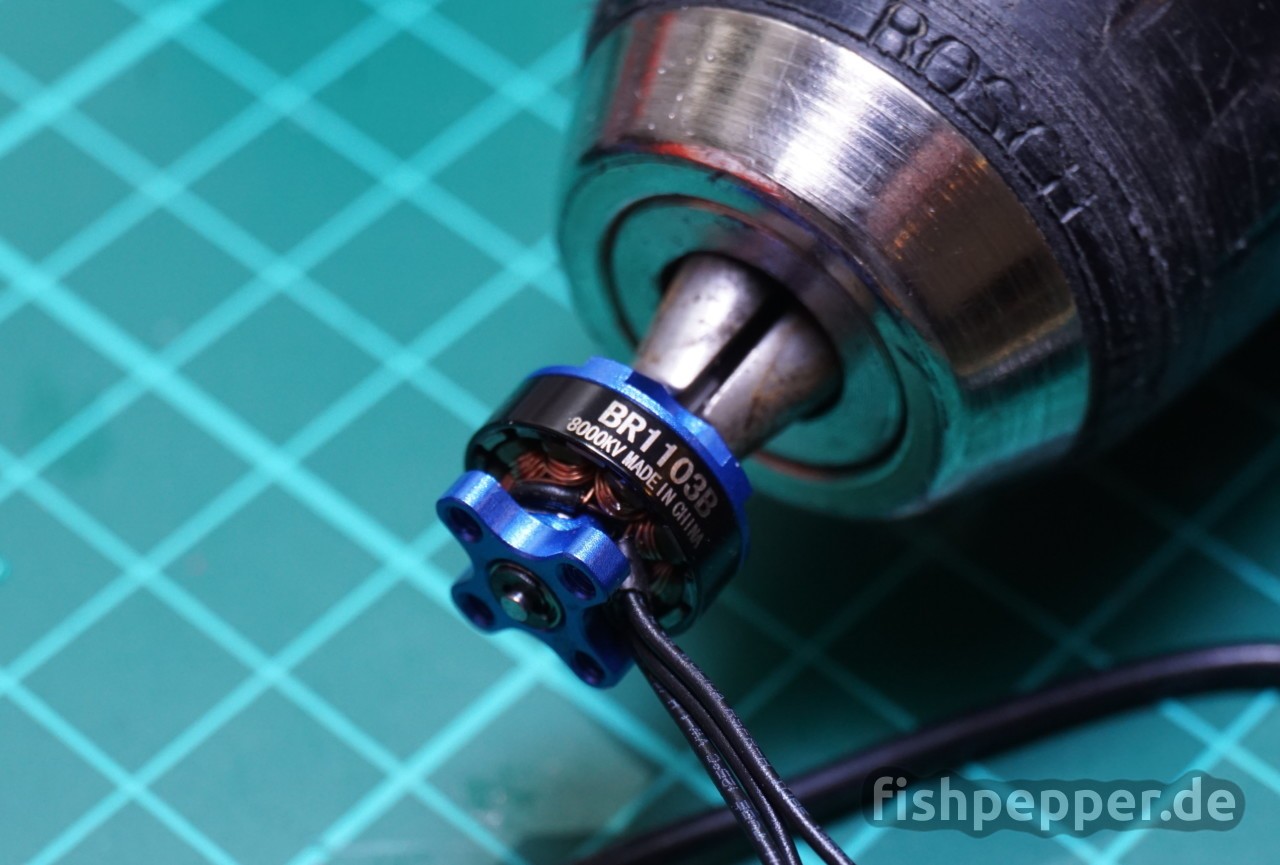
So how does the measurement work? Connect the ground and signal clamp of your scope to a random pair out of the three phases of your motor. Do not connect anything else, especially do not leave an ESC connected. Now take a drill press or an electric screwdriver and attach it to your motor and let it spin at the maximum speed.
You will observe a sine wave on the scopes screen. Adjust the trigger, time-, and voltage scale to have one full oscillation on the screen and take a single measurement or take a screenshot, this makes the analysis much easier:
The first step will be to calculate the rpm of your drill by measuring the period of the sine wave. In my example you can see a period of 9.7ms which equals

Thus the electrical field in the motor is rotating with

You might be wondering that this looks way to high for a typical electric screwdriver and you are right. We have just measured the electrical RPM of our motor. Every magnet in our motor interacts with the coil windings. In order to convert this rpm value to the real mechanical rpm we need to know the number of magnet poles our motor has. You can have a look at the motor specs or simply count the number of magnets and divide this number by two. In the case of the BR1103B you can count 12 magnets which equals 6 magnetic pole pairs:

Ok, this sounds reasonable for my drill as its label states a maximum rpm of 1300 . Now it is time to read the induce voltage by having a look at the peak voltage on the scope picture. In this case it reads as 0.129 V. The KV value can now be calculated as:

That’s close to the manufacturer specification. You might be wondering about the factor of 0.95. Well, this fudge factor has been introduced to accommodate for some deviation from the theoretical motor model. It seems like most of the industry is using this factor.
[3] Multimeter + RPM meter
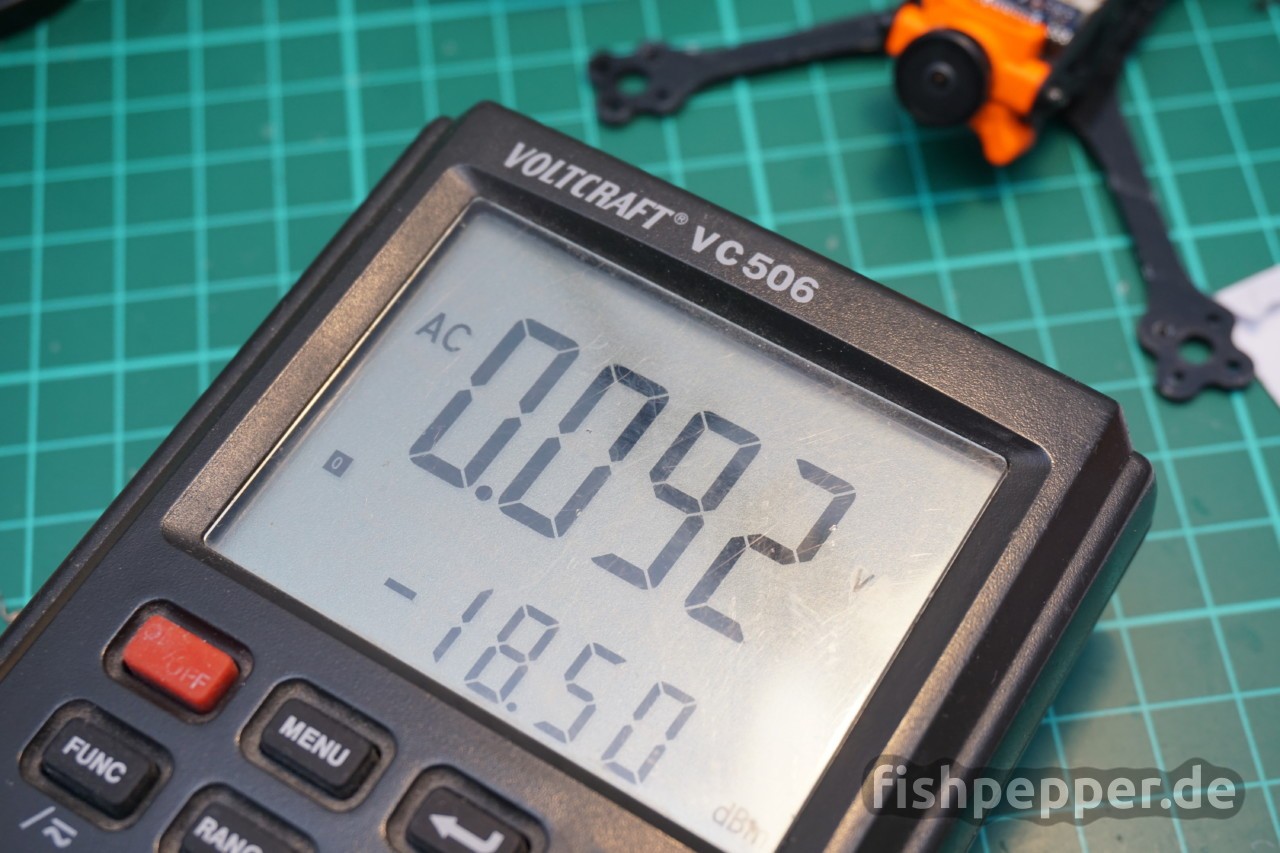
This is probably the cheapest way to measure the Kv rating. You will need a multimeter that can measure AC voltage and a cheap RPM meter (e.g. this $7 rpm meter will do just fine).
Set your multimeter to AC and connect the leads to two motor wires using alligator clips, add reflective tape for the rpm meter, and spin the motor with your drill:

Measure and write down the voltage reading:
And do the same with the RPM meter:

Please note that your voltmeter measured the RMS voltage and not the peak voltage as with the scope measurements. This is compensated for by using this formula:

That’s close to the value we calculated using the oscilloscope. You see that minimal differences in voltage readings can influence the actual KV reading quite a bit. I am not sure how calibrated my VC506 multimeter is. I bought it in the nineties when I was a teenager…
[4] Thrust test stand
Of course you can also use a brushless motor test stand such as the rcbenchmark 1520 or 1580 series to determine the motor KV. The Canadian post was quite fast, it just delivered one of those fancy toys to me. You can expect a tutorial and some more motor benchmarks soon!
In order to measure the Kv value using one of those test stands all you have to do is to hook up the motor without a propeller (remember, we want to measure it under no load!) and start a test script. Some seconds later you will see the test results:
> Started script: Measure KV.js
> Initializing ESC...
> Setting "esc" to 1000
> Waiting 4 seconds...done
> Ramping esc from 1000 to 2000 in 15s.
>   ramping 100.0%, val 2000
> Waiting to reach steady speed
> Waiting 4 seconds...done
> Reading and averaging next 100 readings...done
> Motor KV value 4536
In my case the motor was measured to have a Kv rating of 4536 rpm/V. Quite close to the 4700 rpm/V that I had calculated when I was rewinding it.
… But why?
You are probably asking yourself why you should measure the Kv of a motor? I would argue because you can! No, seriously you do not have to measure the Kv of the motors you buy. They should all come (roughly) with the Kv rating the seller specifies. However, if you (re-) wind a brushless motor on your own you might want to verify that you reached the targeted Kv rating.
And that’s exactly what I am going to do next: I am going to rewind a brushless motor to a specific Kv value that does not exist in stock. Why? That’s stuff for another blog post. Stay tuned…
Great and very informative post again , i dis not expect anything else 🙂 BUT i saw something in the background of one of the pictures …. a new frame with runcam micro on it … can’t wait for the next ESC and the frame to come out and please do not forget the new OSD
regards