In the previous tutorial we flashed the betaflight firmware into the STM32 of our flightcontroller, this time we will flash the tinyFISH FC receiver firmware. We are going to use the frsky compatible OpenSky firmware. You can now decide to download the latest version of OpenSky here and build the tinyfish target yourself (make TARGET=TINYFISH). Or you can download the latest release hex file from the release download page (download opensky_tinyfish_full.hex).
In order to flash this hex file into the receiver you will need a cc debugger or an arduino/rapsberry set up with special software. In this tutorial I am going to use the TI CC Debugger. Before we can start flashing we will have to connect the cc debugger to the CC2510 ISP port:
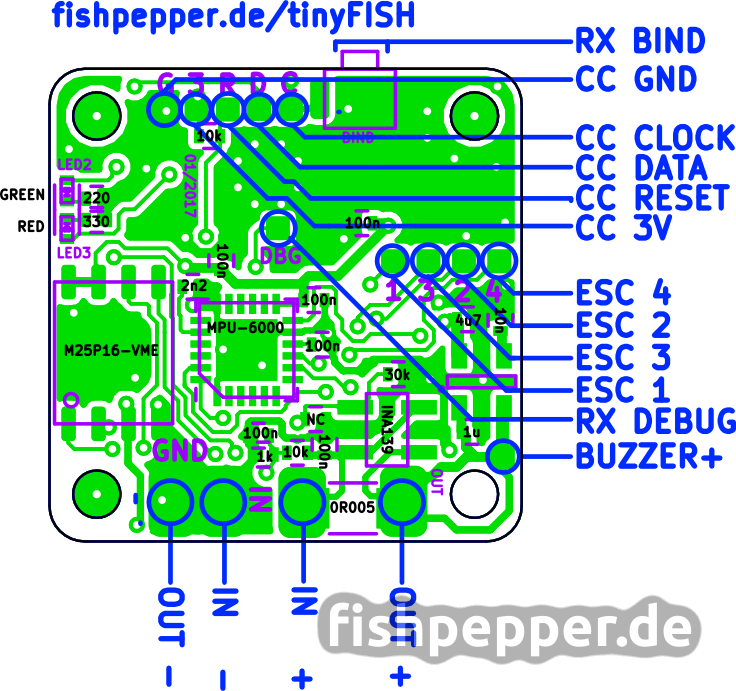
Please use the following connection scheme:
CC GND   -> CC DEBUGGER PIN 1 [GROUND       ]
CC CLOCK -> CC DEBUGGER PIN 3 [CLOCK        ]
CC DATA  -> CC DEBUGGER PIN 4 [DATA         ]
CC RESET -> CC DEBUGGER PIN 7 [RESET        ]
CC 3V    -> CC DEBUGGER PIN 2 [VOLTAGE SENSE]
Once connected make sure to power the FC by connecting 4V to the IN- and IN+ connection tabs. Press reset on the CC debugger, the CC debugger led should turn green. The following commands will download, build, and flash the latest OpenSky firmware for your tinyFISH FC:
git clone https://github.com/fishpepper/OpenSky.git
cd OpenSky
export TARGET=TINYFISH
make clean
make flash
In case you downloaded the pre-compiled hex file you can flash it using the TI cc debugger application or by executing
cc-tool -f -e -w opensky_tinyfish_full.hex
Both ways should give you a similar output as this:
Programmer: CC Debugger
Target: CC2510
Erasing flash...
Completed
Writing flash (13 KB)...
Completed (1.45 s.)
Done! Your FC is flashed! Now disconnect the programmer and press the bind button (or short the pads on rev 0.1) while unplugging and reconnecting the power supply. Put your TX in bind mode. The red and green leds on the bottom of the fc should do some blinking and stop with a regular pattern. Power-cycle the FC again and switch your fc into normal mode, you should now see a steady pulsing green light (or red if you accidently swapped the leds on assembly 😉 ).
Is there any video on how to set up this tinyfish tower with the frsky receiver? A few friends and i are interested but the needing a debugger and there being little to no instruction on how to use is a little intimidating. i have read all the pages here and the part about the debugger and how to hook up/ flash is very vague. Any help is appreciated thank you
There is a tutorial on how to flash the board.
tutorial1: flashing betaflight
https://fishpepper.de/2017/01/17/tinyfish-fc-initial-setup-flashing-tutorial-i-ii/
tutorial2: flashing opensky to the rx
https://fishpepper.de/2017/01/18/tinyfish-fc-initial-setup-flashing-tutorial-ii-ii/
I’m not able to bind it to my Taranis QX7.
Is it possible to bind with the LBT Version of the Taranis?
Does the Receiver support Mode D16 with an output of 8 or 16 Channels?
You will need to flash the transmitter to international D8 mode.
Your work is excellent.
Recently, I got a tinyFISH 0.2 from the market. I found the voltage and current telemetry not work.
On my X9D+, i can see other data updating, but the voltage and current value don’t change. I used two 1s lipo with different voltage for testing. But voltage value doesn’t change from telemetry.
When i open Betaflight configuration tool, i can see the voltage is correct and change after changed the battery.
Could you provide some suggestions about this issue?
Thank you.!
Try to arm the quad, does it now show up?
I found it caused by the bat_detect_thresh setting from FC side. Originally ‘set bat_detect_thresh = 55’, 1s Lipo power supply cannot reach the threshold. So after set bat_detect_thresh = 25, the issue is solved.
Short update:
flashing worked out, i just failed to solder the LEDs correctly (they are on backwards). Everything works, transmitter is bound, just no optical feedback. Feel free to delete the last comment 😉
Best regards,
David
Hi Simon,
i managed to successfully flash the cc2510 using a raspberryPi and jimmyw’s fork of CCLib [1]. The problem is, that the LEDs of the receiver part of the FC don’t turn on and binding with my transmitter does not work either. The main MCU works fine and is currently flashed with betaflight. Do you have an idea what the problem could be or how i would go about verifying that the cc2510 is working correctly?
Regards,
David
[1] https://github.com/jimmyw/CC2510Lib
Did the flashing/verify suceed? Check the crystal and the capacitors (maybe you swapped them with the wrong value?). Could be a problem that the crystal is not starting up -> the code will not run. If i remember correctly the cc2510 uses an internal osc for flashing.
It all worked out, i just goofed up the direction of the LEDs. So no optical feedback for me 😉
Trying to flash the CC2510 on Linux through an arduino (nano).
Wired up according to this:
https://github.com/fishpepper/CC2510Lib
When I run anything it detects the arduino, and the lights on the CC2510 go off momentarily, but it returns this:
ERROR: ord() expected a charecter, but string length 0 found
Any ideas?
Cheers,
Sam
I’m also trying to flash the CC2510 with Arduino Mega (Windows) and facing the same error: “ERROR: ord() expected a charecter, but string length 0 found”.
@Sam, did you solve this problem?
do the usky, tinyfish support DSM(spektrum) protocol?
No, both are only compatible to Frsky D8 mode.
Hi Simon,
I have found a new problem,the fc board is easy to restart.
You mean it resets in flight? This should not be the case. Together with some friends we have finished and flown six different pepperF1SH without any problems. You can actually fly until the Lipo is dangerously deep discharged without noticing…
Did you use the correct voltage regulator?
Hi Simon,
I want to install firmware upgrades for the RX from within betaflight,what shout I do?I have short the rx boot pads,but I don’t know what to do next.
Did you do the initial flashing with a cc debugger? You need to do that first to install the bootloader. Once Opensky was initially flashed you can use the bootloader to update.
yes,I have done the initial flashing with a cc debugger first,now I want to install firmware upgrades for the RX from within betaflight,but I don’t know what to do ?In betaflight I don’t find a interface to load
upgrades.hex file.Could you mindly to write a document to introduce how to upgrade?
I just wrote the tutorial, here you go:
opensky tinyfish firmware update through the bootloader
Hi!I have compiled 3 files.What is the use of the opensky_tinyfish_update.hex and bootloader.hex?
1) opensky_tinyfish_full.hex = bootloader + opensky_tinyfish_update.hex
2) opensky_tinyfish_update.hex = only opensky fw
You will flash #1 when you do the initial flashing with the cc debugger. Aftzer that you can use betaflight to update the opensky fw using the bootloader. When you do this you will need to flash opensky_tinyfish_update.hex which does not include the bootloader. The bootloader can not overwrite itself during update 😉
Hi Simon,
it will be very helpful if you have the time and explain to us how to flash the cc2510 using a regular arduino because not all of us have cc debugers 🙁 and also on rev0.1 board there is a boot pads also next to bind ones , what are they for ?
thanks
sevo
I might do this in the future.
When you short the rx boot pads on v0.1 (or press the button on 0.2) during power up, OpenSky will enter a special bootloader mode. This way you can install firmware upgrades for the RX from within betaflight (!) I will write a tutorial on that soon.
However thihs does not help you with the initial flashing, the bootloader is flashed together with your initial Opensky flashing.
Hi Simon,
I download the latest release hex file from the release download page (download opensky_tinyfish_full.hex)
flash the tinyFISH FC rev 0.2 receiver firmware. Unable BIND.can You publish a REV0.2 receiver firmware?
thanks
PHM
Try to bind by shorting CC_CLOCK to GND. Does this work? The hex file should support both options.
Hi Simon,
shorting CC_CLOCK to GND. Not work
I found a problem with the 0.2 hex file. Try the new revision 0.2.1 from the github release page.